Exciting Things to Come!

Hello my lovelies!


It’s been a while, but I promise it will be worth it. I have an exciting announcement…

The Homemade Pinup is MOVING!

I’ve made the jump to an ~official~ blog, that is mine-all-mine! I’m currently in the process of building the website and making it beautiful, so that’s taking some time. But I see the light at the end of the tunnel and I’m hoping to launch within the week.


I have some fun collaborations to follow, as well as several post series in the works on living with vintage and on vintage vintage looks at non-vintage prices. Things are really getting exciting for me and I can’t wait to share. Is there anything in particular y’all would like to see for the future?


Also brand-new is my official logo. I had this vision in mind and was able to find a graphic artist who took my rough sketch and buffed out the edges to make it beautiful. I thought the image was simple but still very indicative of my focus on DIY vintage fashion and glamour here at The Homemade Pinup (hello, sewing shears!). I really hope y’all like it!


homemadepinup_pink

homemadepinup_lavenderhomemadepinup_blue


Big things are happening and I’m so thrilled to have them coming ahead at my new site. As far as I understand it, my current subscribers will be transferred over to the new URL, but when I launch I may ask y’all to follow me again there just to be safe 🙂 From then on, I will be thehomemadepinup.com! (Ooh, so official!) My goal is to have an auto-direct from this address, so the move should be seamless, but I ask you to bear with me if there are any glitches between now and then!


Thank you so much for following me here on my first blog; I hope you continue to the new site as soon as it’s up. I couldn’t do this without you, and it honestly encourages me every time I get a comment – when y’all say that I’m inspiring you to sew and create your own glamour, it makes my whole week!


What have you been sewing lately?
What inspires you?
Tell me something exciting that’s happening in your life!


Until next time – which will be at my BRAND NEW site (!!!),
Lauren || The Homemade Pinup

homemadepinup_pink

Me Made: A 1930s "Vintage Gal" Giveaway Skirt || The Homemade Pinup

Me Made: A 1930s “Vintage Gal” Giveaway Skirt

Not too long ago, I was fortunate enough to win the blogiversary giveaway from the lovely Vintage Gal! As if designed for the vintage-obsessed seamstress that I am, Cate was offering up a custom-drafted pattern for her 1930s Kick-Pleat Skirt. I was all too thrilled to work with Cate’s pattern and to be able to soon boast a fresh new summer skirt.


Me Made: A 1930s "Vintage Gal" Giveaway Skirt || The Homemade Pinup

Me Made: A 1930s "Vintage Gal" Giveaway Skirt || The Homemade Pinup Continue reading

Review: Vintage-Inspired Cosmetics from Le Bombe Beaute, Part 2

Welcome back for part 2 of my review of makeup brand Le Bombe Beaute! If you missed it, yesterday I went over Part 1: the 1940s Beaute kit: eyeshadows, liner, blush, lipstick, liner/brow stencils, and sealer. Today I’ll be going over the Movie Star Powder kit, a rather unique offering in the vintage cosmetics world!

Movie Star Powder Kit

IMG_9178

Continue reading

Review: Vintage-Inspired Cosmetics from Le Bombe Beaute, Part 1

Hi y’all!

Today I’m happy to be reviewing cosmetics courtesy of Le Bombe Beaute, a new vintage-inspired makeup brand. I was offered two of their kits: the Movie Star Powder kit and the 1940s Beaute kit. The kits I received are slightly smaller than what’s shown and listed on their site, but I’ll do my best to review what I think about their products! The first half will come today, and I’ll talk about the second kit tomorrow. A two-for-one special!

The 1940s Beaute Kit

Le Bombe Beaute
The 1940s Beaute Kit (compact and mascara tube are mine)

Continue reading

Me Made: A “Gertie Fabric” Blue Floral Daydream (+ Butterick B5209 review)

My wardrobe has been feeling a bit lackluster recently – everything feels old and tired. I logically know that’s not the case, but you know how it is. If you don’t get something new and exciting every once in a while, NOTHING is right. So I planned a new dress!

This dress was a bit of a sudden decision but, now that it’s finished, I feel like it was meant to be. I rarely go to the fabric store without a plan, though a few of the newer fabrics from the Gertie Hirsch collection at Joann Fabric really caught my eye. These fabrics seem much higher quality than the usual Joann offerings, and include some nice rayons. A rare sight! While I’m not necessarily the biggest fan of the collection as a whole print/pattern-wise, a couple of the designs look quite authentically vintage – count me in!

I ADORE the combo of this fabric and the sewing pattern I used. The fabric is a cotton sateen with a floral sketch print. This design also comes in a rayon, but the background color for that one is a beautiful sunny yellow. The fabric washes and dries well, though it has a tendency to crease quite easily. The bodice is lined in a beautiful white cotton sateen from Renaissance Fabrics, which I also used to make my Regency stays and I plan on using as the lining of my 1860s corset (do not buy the solid sateen from Joann, it hardly looks like sateen at all). Highly recommend!

My pattern is Butterick B5209, a modern pattern that’s a 1947 reprint. So this counts for the Big Vintage Sew-Along, hosted by McCalls! I love the reprinted patterns, because they’re authentic but accessible. They’re an excellent place to start, although the downside can be that the fit and the instructions have been “modernized.”

The Homemade Pinup: A "Gertie Fabric" Blue Floral Daydream (+ Butterick B5209 review)

I cut out one full size smaller than my envelope size, and it fits wonderfully. Alterations: I shortened the strap slightly, adjusted the position of the bust, and fit it particularly to my waistline rather than following the pattern’s waist. I also ignored the complicated hemming instructions and used my customary machine-sewn blind hem.

The Homemade Pinup: A "Gertie Fabric" Blue Floral Daydream (+ Butterick B5209 review)

This pattern is listed as easy, but I would label it for the courageous and advanced beginner i.e. someone who is confident of their ability and has the basic skills very solidified. Certain elements were quite fiddly, confusing, and/or annoying. The end result, however, makes all this worth it. I am obsessed!

The Homemade Pinup: A "Gertie Fabric" Blue Floral Daydream (+ Butterick B5209 review)The Homemade Pinup: A "Gertie Fabric" Blue Floral Daydream (+ Butterick B5209 review)

The dress is very comfortable and light, and it can be dressed up or worn for more casual outings. I’ve already worn it three or four times, can you believe it? I worked really hard to match the patterns on the front midriff piece, as well as placing similar roses on either bust piece. Not everything was possible to match, as I found out for the back bodice, but I still tried to make it look cohesive. I’m very proud of the result!

The Homemade Pinup: A "Gertie Fabric" Blue Floral Daydream (+ Butterick B5209 review)The Homemade Pinup: A "Gertie Fabric" Blue Floral Daydream (+ Butterick B5209 review)

All in all, I would say this pattern is worth trying. It gave a beautiful result after a bit of adjusting and fiddling, and I’m sure I’ll be using it again.


What’s your favorite sewing pattern(s) to use? Modern or vintage or otherwise?

Do you have summer wardrobe plans?

Have you worked with any of the Gertie fabrics?


Until next time,
Lauren || The Homemade Pinup

Me Made: A Bedsheet House Dress

Fairly recently I discovered that house dresses in the vintage years were nothing like the house dresses of today. I think most of us associate these with something like a mumu or a shapeless robe for bumming around in. What does this have to do with simple vintage glamour?

Well, of course vintage gals – or, rather, designers at the time – knew exactly what they were doing. Women were encouraged to be put-together from the moment they woke up. From a feminist standpoint, this seems rather stifling, but I also like to look at the other side of the coin – the idea was that it made a woman and her family feel more upbeat and optimistic, which was even more important during wartime in the 1940s. I know personally that I have a healthier attitude in general when I feel good about how I look and dress.

A housewife spent much of her time, as you’d imagine, in her house. The vintage solution to looking prim and proper while cooking and cleaning? The house dress. House dresses were a bit looser but maintained the same lines as their daywear counterparts. I believe the house dress began in the 1920s and continued from there. Common elements include wrap fronts, less detail, large external pockets, and hardier, brightly colored materials. You can read more about the house dress in various forms on Gertie’s blog, on Festive Attyre, and on Vintage Dancer (1920s, 1930s).

I saw the below pattern cover from Simplicity and fell in love with the short-sleeved option. Of course I was too impatient to find the pattern, buy it, and wait for it to arrive, so I cobbled together my own pattern. I altered a vintage blouse pattern from my collection for the bodice and freehanded all the rest.

8cd38b503b28411b1b3860b80700c735

The verdict? I ADORE it. I feel so much more put-together when I throw this on for a day of laundry and cooking and cleaning. I also work from home many days and refuse to spend my days in sweatpants or leggings, so this is perfect. I wear it out occasionally, but generally I keep it to my house just like the vintage gals of yesteryear. The wrap style is especially pleasant to wear!

Me Made: A Bedsheet House Dress

I decided to bake up some cookies in true vintage spirit. Gluten free chocolate chip! They were yummy and easy to whip up with very few ingredients. My recipe came from Imma Eat That – no affiliation, I just found the recipe online and thought I’d share in case some of y’all are gluten-free too! (Featuring a glimpse of my true vintage 1930s apron.)

Me Made: A Bedsheet House Dress

In the era’s make do and mend spirit, I made my dress out of some bed sheets that we no longer had a use for at my house. The skirt is even pieced behind the crossover, so I feel very true to the spirit of the 1940s!

Also, take a look at my new-to-me shoes. They’re 1940s Red Cross slingbacks and I’m absolutely in love with them.

Do you have a glamorous home outfit?

Do you think the concept of fashionable at-home wear is a feminist concern or a brilliant invention to help the homemake feel lovely?

What’s your favorite cookie recipe?!

Until next time,
Lauren || The Homemade Pinup

Me Made Monday: #twinning 1950s matching separates

Today I finally get to blog about my most recent make, a 1960s set of separates! On the pattern cover, the top and skirt are made from the same fabric and, when worn together, mimic a dress. To me, that screams VARIETY, so I was all in!

Advance 8288

My sewing BFF Rachel bought c. 1957 “sub-teen” pattern Advance 8288 for a dress to wear to Disneyland and convinced me to sew one too. We love to match so she and I went all out and did EVERYTHING the same! We chose one of Gertie’s newer fabrics – a lovely, supple rayon print – and trim from Joann’s notions wall for ease (we don’t live in the same area). Projects like this remind me that the big companies really do have some nice things to offer if you dig!

Me Made Monday: #twinning 1950s matching separates

Me Made Monday: #twinning 1950s matching separates

I did not use the pattern myself, instead Frankenstein-ing two different vintage patterns from my stash for the blouse and creating a simple dirndl-style skirt. It worked fabulously all the same and really upholds the look of the pattern art, I think!

We debuted our matching ensembles at Disneyland, which was so fun! Rachel wore her blouse and borrowed my PUG Italy skirt, since her skirt wasn’t able to be completed before the Disneyland trip.

This weekend Mr. Homemade Pinup and I took a trip to Sherman Library and Gardens in Corona Del Mar, where I snapped some more photos. The fabric makes this set so wearable for the oncoming SoCal heat! I love me some rayon.

Me Made Monday: #twinning 1950s matching separates

Details: vintage metal zippers for both blouse and skirt, contrasting pink cotton pockets, deep machine-sewn blind hem on the skirt. My only complaint with this project is that the blouse is perhaps a smidge too big, and the waistband’s interfacing never really fused since I was afraid to use a hot iron on the rayon. Besides that, I really do enjoy the cheerful print and that I can accessorize with PINK! And I can really tell that I’ve mastered the blind hem technique, as my hem stitches are truly invisible – a very satisfying feeling.

Sherman Gardens was a great background for some snapshots and was such a nice retreat. I loved viewing all the different colors and textures of the plants, and since many were in bloom the gardens smelled amazing! I particularly liked the areas landscaped with all edible plants, like lettuce, strawberry, and herbs – Disneyland does the same thing in certain “lands” (especially Fantasyland) and it is so charming.


Are you feeling the spring weather yet?

Where do you go to escape the cityscape (if you live in a city like me)?

What’s your favorite vintage ensemble for warmer weather?


Until next time,
Lauren || The Homemade Pinup

Tutorial Thursday: DIY Vintage Crop Sweater!

I am so excited to share my first tutorial! Long ago I found an amazing article about upcycling regular cardigans into fabulous, vintage appropriate sweaters. When I couldn’t find it again, I thought I should give y’all my own version.

DIY Vintage Cropped Sweater! -  The Homemade Pinup

I’ve been frustrated by cute sweaters in my wardrobe that were just too long to look nice with the high-waisted vintage fashions I wear. These three cardigans all hit the hip or lower originally. They are unintentionally red, white, and blue! The red was given to me by my mother and has some lovely chiffon rose decoration around the neckline. The white was from an Ann Taylor Loft sale, while the navy sweater features my college sorority’s crest.

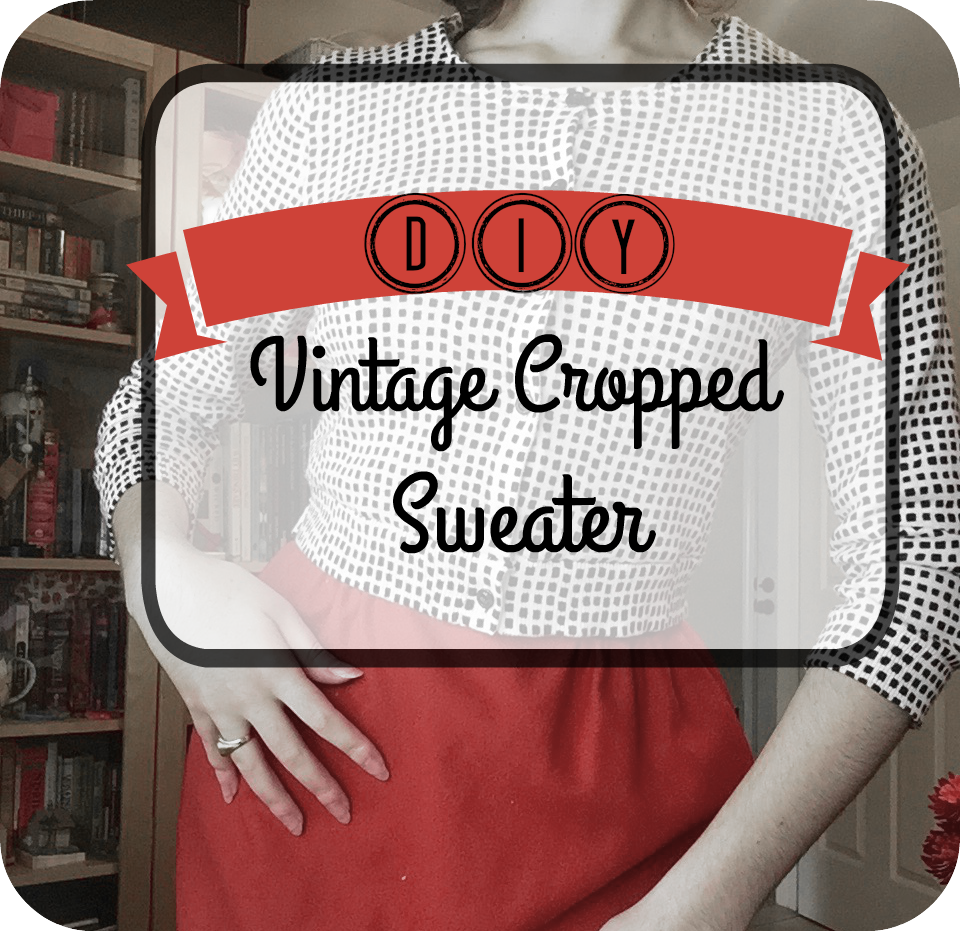
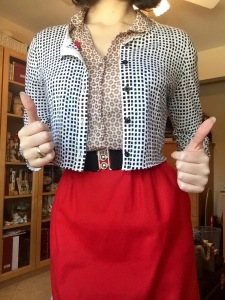
I took some before pics but they ended up looking TERRIBLE so.. sorry :3 My after pics aren’t so great either. Let’s just agree that I never claim to be a professional photographer 😉 All my sweaters were hip length or slightly longer to start. You can see the length of the white sweater in the first photo below.

HOW TO:

Find a sweater that needs updating. Shop your wardrobe, thrift stores, sales – the sky is the limit! Look for a color you need with maybe some fun beading for an extra vintage touch.

Put on your cardigan and mark where you want the finished sweater to hit. For this style, I recommend that it hits 2-3 inches below your natural waist. This part can be tricky because you need to plan around the buttons and buttonholes on your sweater – I pick the button/buttonhole pair that is closest to my natural waist, because adding the waistband later will make it longer. Mark (with pins, or count up the buttons from the bottom).


Measure from the bottom of your sweater up to these pins. Mine were around 5.5″. Add in a seam allowance of 1/2″-5/8″- making your cutting point 5″ up from the hem, if you use a 1/2″ allowance like me. Mark that distance all along your sweater on the INSIDE with chalk. The pins can be removed at this point.

Cut along this line.

Then, on the part you just cut off from the main body of the sweater, find the hem band of the sweater. Sometimes this is sewn on (in the case of my blue sweater), sometimes it is woven in (on my red and white sweaters both). Add the same seam allowance amount that you used in the previous step. Mark, and cut along this line.

IMG_4555

Now you have two pieces: your main body and the hem edge. Pin them together at the cut edges, right side to right side. You may have to remove a button to make the cutting and sewing easier and sew it back on afterward.

At any places that must be matched up, like the side seams or the button facings: hold the two pieces together and gently pull back the top layer so you can see the seam. Make sure they lay precisely on top of one another and use extra pins! Do NOT remove these pins as you’re sewing before they’re under the presser foot. I usually just sew over them to make sure my seams will not shift and they will match up perfectly.

Sew a 1/2″ from the edge (or 5/8″ if that’s your chosen allowance), being sure to stretch the sweater as you sew. Often you need to stretch anyway to because the band section you’ve cut will be a bit shorter than the body section. Stretching the fabric will allow your sweater to maintain its stretch. A slightly longer stitch length helps as well. (Practice on the piece you cut off and discarded if you’re nervous.)

Admire your new cropped sweater! To complete, press the new seam towards the hem well and then trim the seam. If you’d like, you may zig zag over the cut seam, but I only did that for one sweater.

You can also use this same process for sleeves to create cute bracelet-length sleeves! I chose not to at this point, because I like options to pull it long since I get cold easily.

The sky is the limit for your customized sweaters! I also replaced the boring plastic buttons with some vintage buttons from my stash. In the future, I’d like to add ribbon facings along the button facings, like you see in some vintage cardigans.


With only a couple of hours’ work, I now have three “new” cardigans to put into my wardrobe rotation that previously sat gathering dust!

What cardigans will you upcycle to make them more vintage appropriate?


Until next time,
Lauren || The Homemade Pinup

Me Made Pencil Skirt (Vintage Simplicity 3257 Review)

This week I have a review for a fabulous combo pattern by Simplicity for both a pencil skirt and cigarette pants. With such smart separates, what more can you ask for?

S3257

This pattern is excellent because it includes different cutting lengths for various heights! I know it’s relatively easy to extend or shorter a hem length, but this pattern simplifies that. I never turn my nose up at effective alterations like that! I also peeked ahead and saw that they give you directions for customizing the seat rise for the trousers. Excellent!

My pattern has a 26 inch waist. I am a 27″, but I betted on the pattern having a bit of wearing ease, as usual – and it didn’t. So if you buy this pattern, buy to size! The waistband ended up at just about 26 inches, so it’s a bit of a tight squeeze for me.

DSCF1056DSCF1060

This specific project was a remake – I took a skirt I previously had and cut it down! I love reusing fabrics and giving them new life. Sustainability feels good and looks good too 😉 Below is the before!

DSCF0791

The pattern had simple instructions and easy-to-use pieces. I think this pencil skirt only had three pieces! I was looking through vintage images and feel that, though the pattern is from the early 1960s, it is an appropriate skirt for the 1940s through the 1960s and beyond, depending on hemline and how you style it.

My main complaints are that the description of how to lap the zipper was very confusing before it “clicked.” Additionally, they don’t instruct you to unpick the stitches to release the kick pleat in the back.

DSCF1064DSCF1061

I used a ribbon as a hem facing (like the rayon tape in almost all vintage dresses) and did a machine-sewn invisible hem (aka blind hem). I’ve got to admit, after practice I’m getting so good at this! It was tricky to master but it is so, so satisfying when you can barely see the stitches on the right side. Would y’all be interested in a picture or video tutorial?

Though I always add pockets to my projects, I chose not to for this skirt to keep a smooth, tight line.

In summary: I highly recommend Simplicity 3257 for a pencil skirt staple, though I haven’t used it to make trousers yet. It was quick and easy and includes some great details for truly vintage finishing.

Do you have a favorite separates pattern, vintage or otherwise?

Until next time,
Lauren || The Homemade Pinup

That’s A Wrap! (+ Vintage Simplicity 4130 Review and BONUS review by Gussets and Godets)

I really have been sewing too much for my own good right now. I have a backlist of posts and pattern reviews to write about the plethora of blouses that I’ve made of late. I hope you like vintage blouses cause… you’ll be gettin’ a lot of ’em!

S4130

Today I’m blogging about my experience with vintage Simplicity 4130, lent to me by my vintage sewing BFF Rachel. A call back to my dancing days, I love a good wrap top for their ballerina-like beauty and their ability to instantly emphasize the figure. This one, made up in a gold-flecked cranberry knit, certainly fulfills those expectations!

DSCF0977DSCF0985DSCF0986

The pattern went together quickly and easily, which is a testament to an early 60s pattern. Things started to get a lot simpler in the sewing pattern world at this time — I’m talking printed patterns and instructions that don’t assume you already know everything about the sewing process.

DSCF0987DSCF0988

As vintage patterns, like their modern counterparts, are known for having ease, PARTICULARLY in the bust, a size 32 seemed perfect for my 34-35″ bustline. I wasn’t disappointed, and this pattern went together perfectly with little need to alter. Part of that is due to the nature of a wrap top, and that’s the beauty of the thing — you don’t HAVE to be perfect at fitting with a wrap top. Highly recommended for a beginning seamstress!

I made a couple minor alterations to the pattern since it’s made for a woven fabric and I used a knit. I simply removed the seam allowance (to account for my fabric’s stretch) and ignored the facings in exchange for a simple turned over hem. Easy as pie.

My FAVORITE part about this pattern? It’s reversible! I can get two looks out of one: a traditional cross-front wrap, or a sultry high-necked, low-back stunner. What more can you ask for?

DSCF0997DSCF1006

If you’re searching for a similar look, Butterick offers B6285, one of Gertie’s patterns. Though I haven’t used it, the pattern looks very similar to mine and it looks beautiful made up. I asked Christina of Gussets and Godets to write a quick review of B6285 for comparison. I think her top turned out beautifully!

This was my first experience of sewing with knits, and I’m not sure why I have never sewn with knits before. I don’t have a special machine for sewing knits, but this wrap top is super cute and I knew I could easily incorporate this into my wardrobe.

The pattern consists of only 2 pieces. One body piece and one for the waist ties. It is a very cleverly cut top and sews up so quickly because there are so few seams. I like that there is no shoulder seam or armhole to fiddle with, the dolman sleeve is sleek and smooth.

Instructions were very clear and easy to follow. Though they assume you know what you are doing so they don’t give any hints and tips on how to sew with jersey which would have been useful. Gertie published a tutorial post on her blog with step by step instruction, photos and advice which I found very helpful and is a nice resource to check if you are unsure of a step.

I sized down one size based on the measurements on the pattern envelope from my recommended size 18 to the 16 and it was definitely the right size for me. It is a very forgiving garment being a jersey wrap so if you are quite busty or flatter chested the fabric will stretch or mold to the body.

From my experience of sewing this knitted top, I can advise that using a ball point needle is a must! A slightly looser tension than for woven fabrics helps avoid snapped stitches when wearing your top and also on any areas under strain.

My verdict: I really love this top! It is so versatile and allows me to wear my pretty cotton summer dresses while still covering up my arms and back in the colder weather. Dress it up or down and it’s super elegant and comfortable! Overall a nice easy project, I didn’t get stuck or confused during the sewing and it was a nice quick make.


IMG_2350

Thanks to Christina, it seems like B6285 is a great alternative if you can’t find the vintage Simplicity 4130! Butterick is easy to find and the look is so close to my vintage pattern, except it has vertical darting instead of Simplicity’s pretty 45 degree angle darts. Additionally, B6285 is not MADE to be reversible, but I suspect it can be worn backwards if you wish. I put on a non-reversible Ralph Lauren wrap top I own backwards, and it worked just fine.

As my grandma says about cooking (via Emeril): there’s no kitchen police! And as I say… there’s no sewing police! If you want to change something up, do so. The pattern won’t turn you in. Wear that B6285 (or other wrap pattern) backwards if you want! Feel free to use a knit instead of a woven (with simple adjustments). Sewing is what you make of it, and that’s the beauty of the thing.

DSCF1009DSCF1013

In summary (TLDR):

  • Simplicity pros = made to be reversible, lovely 45 degree darts. Made for woven fabrics.
  • Simplicity cons = hard-to-find pattern and only sold, as all vintage patterns, one size at a time.
  • Butterick pros = easy access, very similar look, patterned specifically for knit fabric.
  • Butterick cons = not made to be reversible (though likely can be worn backwards), boring vertical darting (lol).


Are you fearless with your sewing or refashions? What kind of adjustments have you made to clothing you own that it wasn’t intended for (like wearing something backwards)?

 DSCF1030

Until next time,

Lauren || The Homemade Pinup

P.S. Remember that I have a Pinterest JUST for vintage style inspiration, organized by decade AND garment type! My Instagram is always a great place to follow my day-to-day happenings and outfits. And though it’s brand-new, I also have a Twitter that I will be using to update on new posts! Thanks for following, darlings!